Advanced Docker
Now that we are relatively comfortable with Docker, lets look at some advanced Docker topics, such as:
- Registry
- Porting a Docker image to a Registry & Repository (public and private)
- Managing data within containers
- Deploying containers on cloud services
1. Docker Registries
To demonstrate the portability of what we just created, let’s upload our built Docker image to a Docker Registry and then run it somewhere else (i.e. CyVerse Atmosphere).
In this exercise, you’ll learn how to push built containers to registries, pull those containers from registries, and run those containers on remote hosts (virtual machines).
This will benefit you when you want to deploy new containers to production environments where testing is not possible.
Important
So what EXACTLY is a Registry?
A registry is a collection of Repositories, and a Repository is a collection of Images. A Docker Registry is sort of like a GitHub Repository, except the code is already compiled, in this case, into a container. You must have an account on a registry. You can create many repositories. The Docker CLI uses Docker’s public registry by default. You can even set up your own private registry using Docker Trusted Registry
There are several things you can do with Docker registries:
- Push images
- Find images
- Pull images
- Share images
1.1 Popular Registries
Some examples of public/private registries to consider for your research needs:
- Docker Cloud
- Docker Hub
- Docker Trusted Registry
- Amazon Elastic Container Registry
- Google Container Registry
- Azure Container Registry
- NVIDIA GPU Cloud
- Private Docker Registry - not official Docker
- Gitlab Container Registry
- CoreOS Quay
- TreeScale
- Canister
1.1.1 Log into a Registry with your Docker ID
Now that you’ve created and tested your image, you can push it to Docker cloud or Docker hub.
Note
If you don’t have an account, sign up for one at Docker Cloud or Docker Hub. Make note of your username. There are several advantages of registering to DockerHub which we will see later on in the session
First, you have to login to your Docker Hub account.
If you want to authenticate to a different Registry, type the name of the registry after login:
$ docker login <registry-name>
Authenticating with existing credentials...
WARNING! Your password will be stored unencrypted in /home/tswetnam/.docker/config.json.
Configure a credential helper to remove this warning. See
https://docs.docker.com/engine/reference/commandline/login/#credentials-store

Login Succeeded
If it is your first time logging in you will be queried for your username and password.
Login with your Docker ID to push and pull images from Docker Hub or private registry.
If you don’t have a Docker ID, head over to https://hub.docker.com to create one.
1.1.2 Tagging images
The notation for associating a local image with a repository on a registry is username/repository:tag. The tag is optional, but recommended, since it is the mechanism that registries use to give Docker images a version. Give the repository and tag meaningful names for the context, such as get-started:part2. This will put the image in the get-started repository and tag it as part2.
Note
By default the docker image gets a latest tag if you don’t provide one. Thought convenient, it is not recommended for reproducibility purposes.
Now, put it all together to tag the image. Run docker tag image with your username, repository, and tag names so that the image will upload to your desired destination. For our docker image since we already have our Dockerhub username we will just add tag which in this case is 1.0
$ docker tag $YOUR_DOCKERHUB_USERNAME/mynotebook:latest $YOUR_DOCKERHUB_USERNAME/mynotebook:1.0
1.1.3 Publish the image
Upload your tagged image to the Dockerhub repository
$ docker push $YOUR_DOCKERHUB_USERNAME/mynotebook:1.0
Once complete, the results of this upload are publicly available. If you log in to Docker Hub, you will see the new image there, with its pull command.
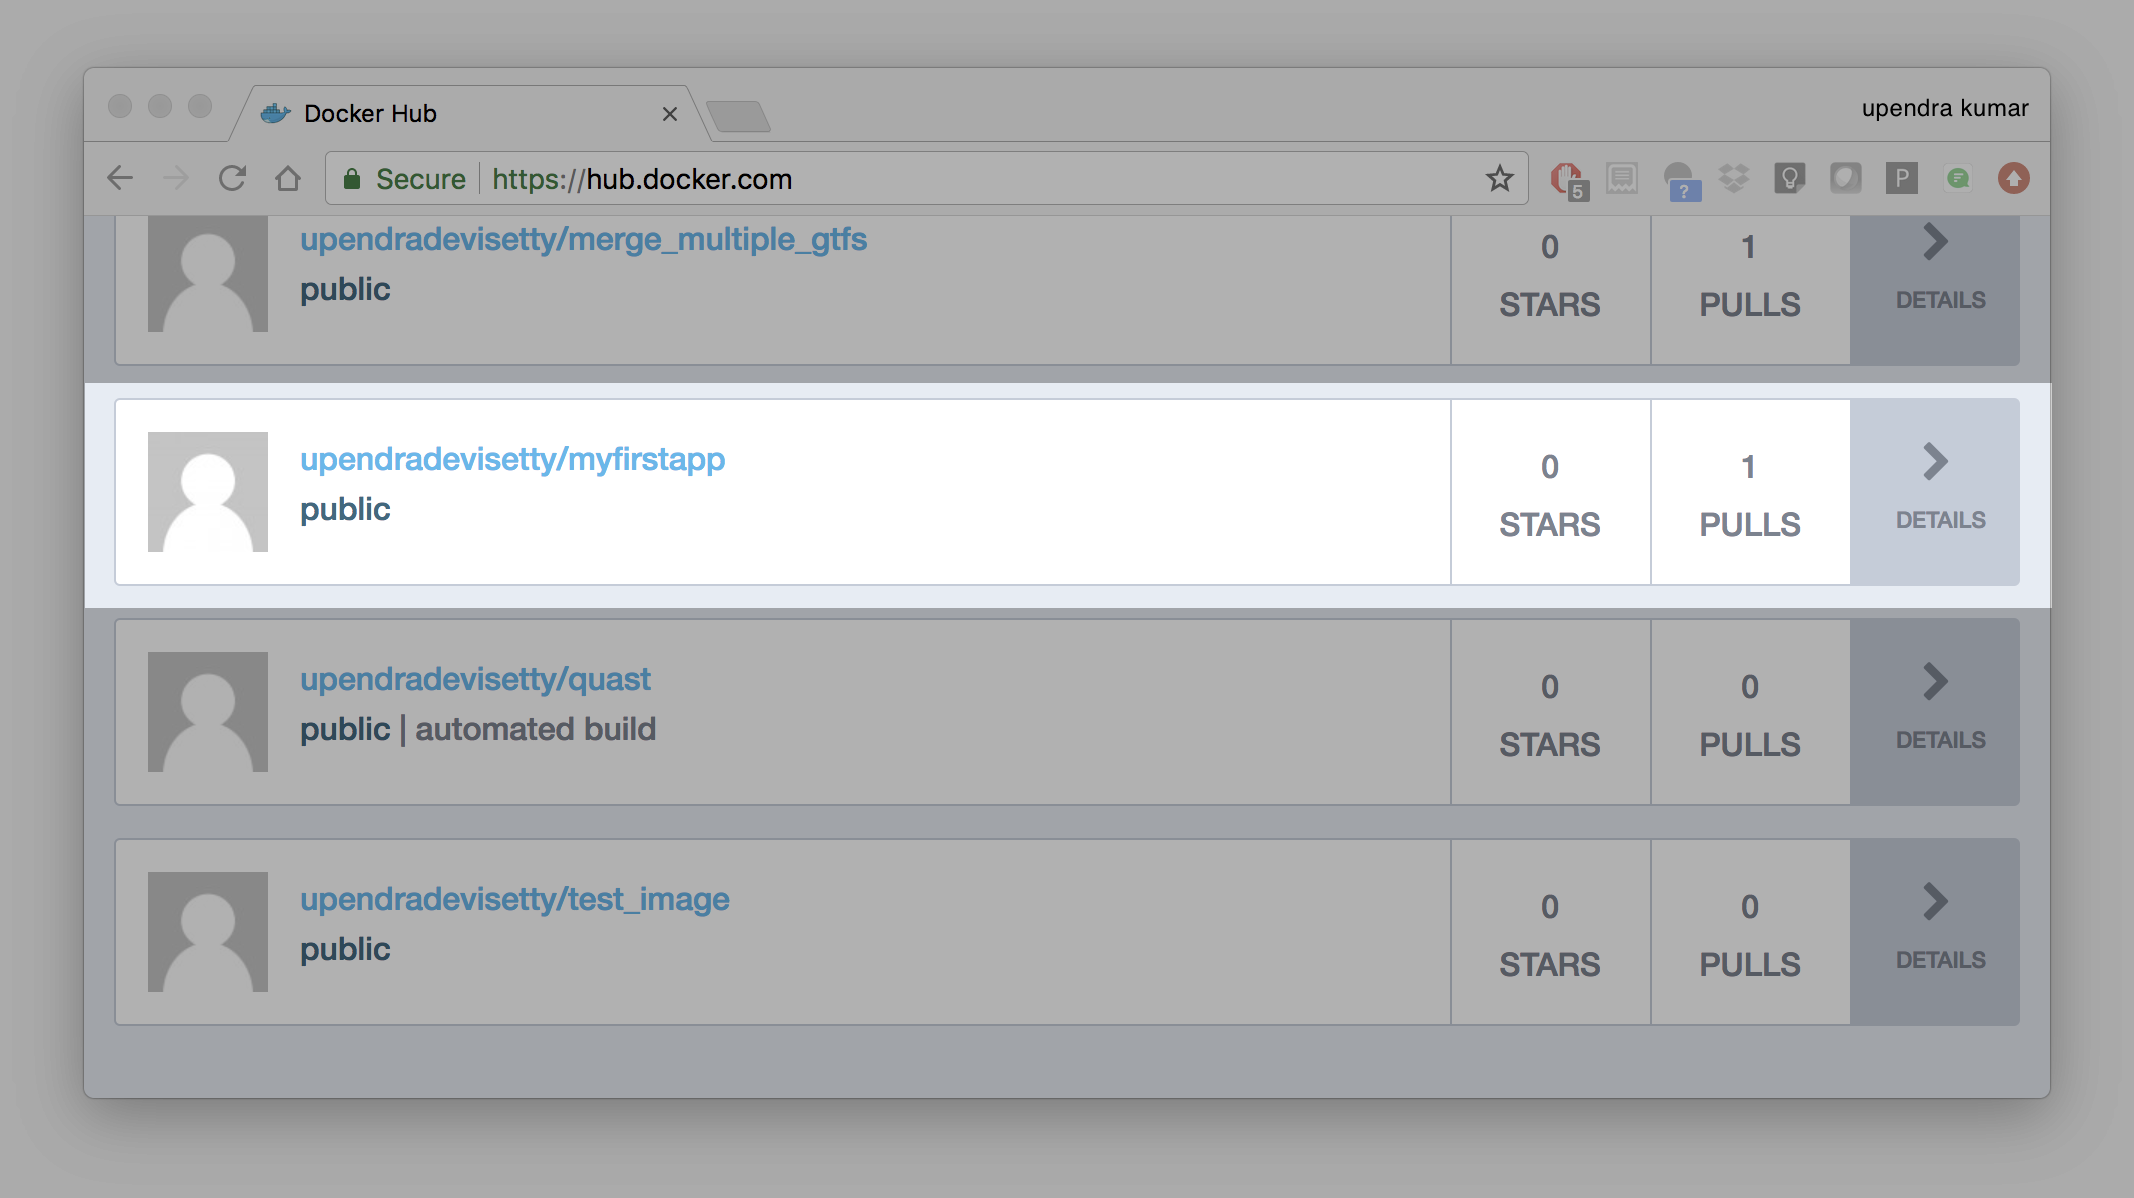
Congrats! You just made your first Docker image and shared it with the world!
1.1.4 Pull and run the image from the remote repository
Let’s try to run the image from the remote repository on Cloud server by logging into CyVerse Atmosphere, launching an instance
First install Docker on Atmosphere using from here https://docs.docker.com/install/linux/docker-ce/ubuntu or alternatively you can use ezd command which is a short-cut command for installing Docker on Atmosphere
$ ezd
Now run the following command to run the docker image from Dockerhub
$ docker run -p 8888:8888 --name notebooktest $YOUR_DOCKERHUB_USERNAME/mynotebook:1.0
Note
You don’t have to run docker pull since if the image isn’t available locally on the machine, Docker will pull it from the repository.
Head over to http://<vm-address>:8888 and your app should be live.
1.2 Private repositories
In an earlier part, we had looked at the Docker Hub, which is a public registry that is hosted by Docker. While the Dockerhub plays an important role in giving public visibility to your Docker images and for you to utilize quality Docker images put up by others, there is a clear need to setup your own private registry too for your team/organization. For example, CyVerse has it own private registry which will be used to push the Docker images.
1.2.1 Pull down the Registry Image
You might have guessed by now that the registry must be available as a Docker image from the Docker Hub and it should be as simple as pulling the image down and running that. You are correct!
A Dockerhub search on the keyword registry brings up the following image as the top result:
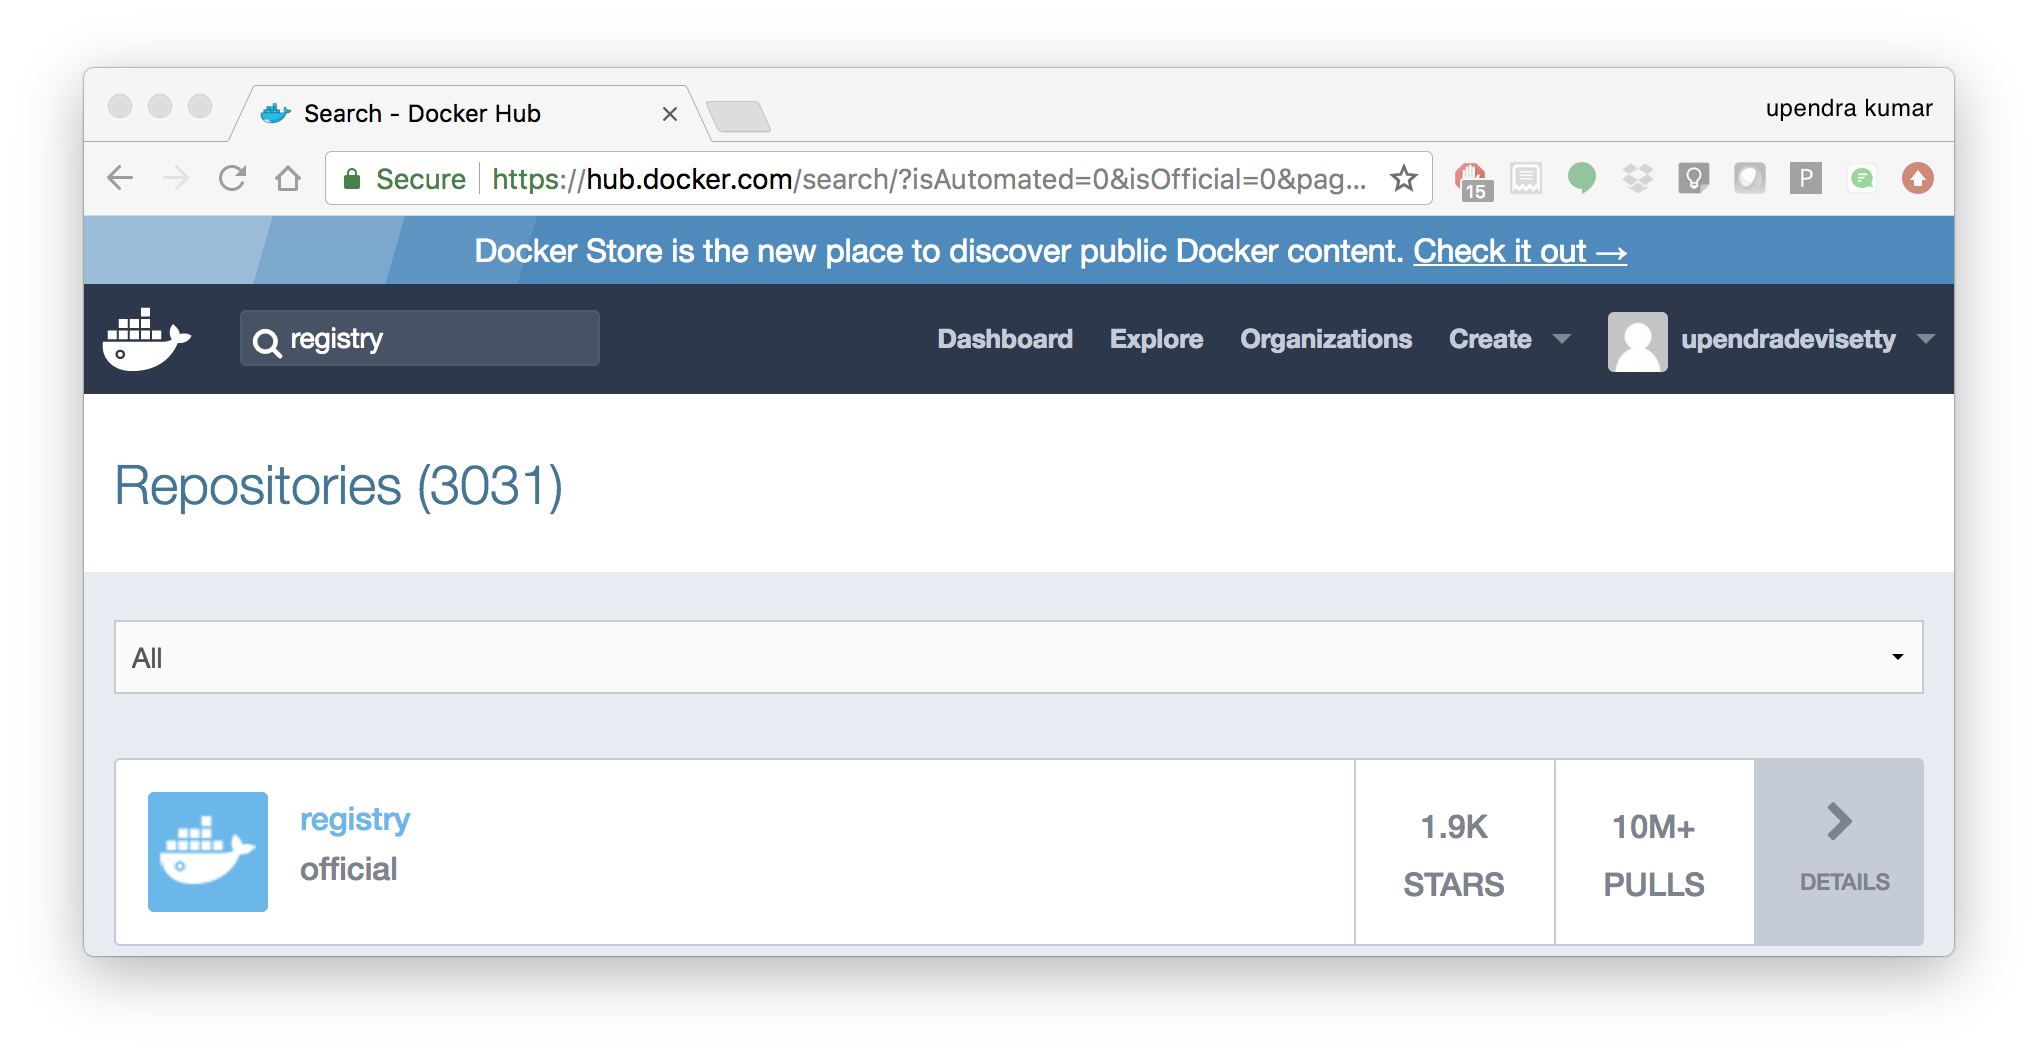
Run a container from registry Dockerhub image
$ docker run -d -p 5000:5000 --name registry registry:2
Run docker ps --latest to check the recent container from this Docker image
$ docker ps --latest
CONTAINER ID        IMAGE               COMMAND                  CREATED             STATUS              PORTS                    NAMES
6e44a0459373        registry:2          "/entrypoint.sh /e..."   11 seconds ago      Up 10 seconds       0.0.0.0:5000->5000/tcp   registry
1.2.2 Tag the image that you want to push
Next step is to tag your image under the registry namespace and push it there
$ REGISTRY=localhost:5000

$ docker tag $YOUR_DOCKERHUB_USERNAME/mynotebook:1.0 $REGISTRY/$(whoami)/mynotebook:1.0
1.2.2 Publish the image into the local registry
Finally push the image to the local registry
$ docker push $REGISTRY/$(whoami)/mynotebook:1.0
The push refers to a repository [localhost:5000/julianp/mynotebook]
64436820c85c: Pushed
831cff83ec9e: Pushed
c3497b2669a8: Pushed
1c5b16094682: Pushed
c52044a91867: Pushed
60ab55d3379d: Pushed
1.0: digest: sha256:5095dea8b2cf308c5866ef646a0e84d494a00ff0e9b2c8e8313a176424a230ce size: 1572
1.2.3 Pull and run the image from the local repository
You can also pull the image from the local repository similar to how you pull it from Dockerhub and run a container from it
$ docker run -P --name=mynotebooklocal $REGISTRY/$(whoami)/mynotebook:1.0
2. Automated Docker image building from GitHub
An automated build is a Docker image build that is triggered by a code change in a GitHub or Bitbucket repository. By linking a remote code repository to a Dockerhub automated build repository, you can build a new Docker image every time a code change is pushed to your code repository.
A build context is a Dockerfile and any files at a specific location. For an automated build, the build context is a repository containing a Dockerfile.
Automated Builds have several advantages:
- Images built in this way are built exactly as specified.
- The Dockerfile is available to anyone with access to your Docker Hub repository.
- Your repository is kept up-to-date with code changes automatically.
- Automated Builds are supported for both public and private repositories on both GitHub and Bitbucket.
2.1 Prerequisites
To use automated builds, you first must have an account on Docker Hub and on the hosted repository provider (GitHub or Bitbucket). While Docker Hub supports linking both GitHub and Bitbucket repositories, here we will use a GitHub repository. If you don’t already have one, make sure you have a GitHub account. A basic account is free
Note
- If you have previously linked your Github or Bitbucket account, you must have chosen the Public and Private connection type. To view your current connection settings, log in to Docker Hub and choose Profile > Settings > Linked Accounts & Services.
- Building Windows containers is not supported.
2.2 Link your Docker Hub account to GitHub
- Log into Docker Hub.
- Click “Create Repository+”

- Click the Build Settings and select
GitHub.
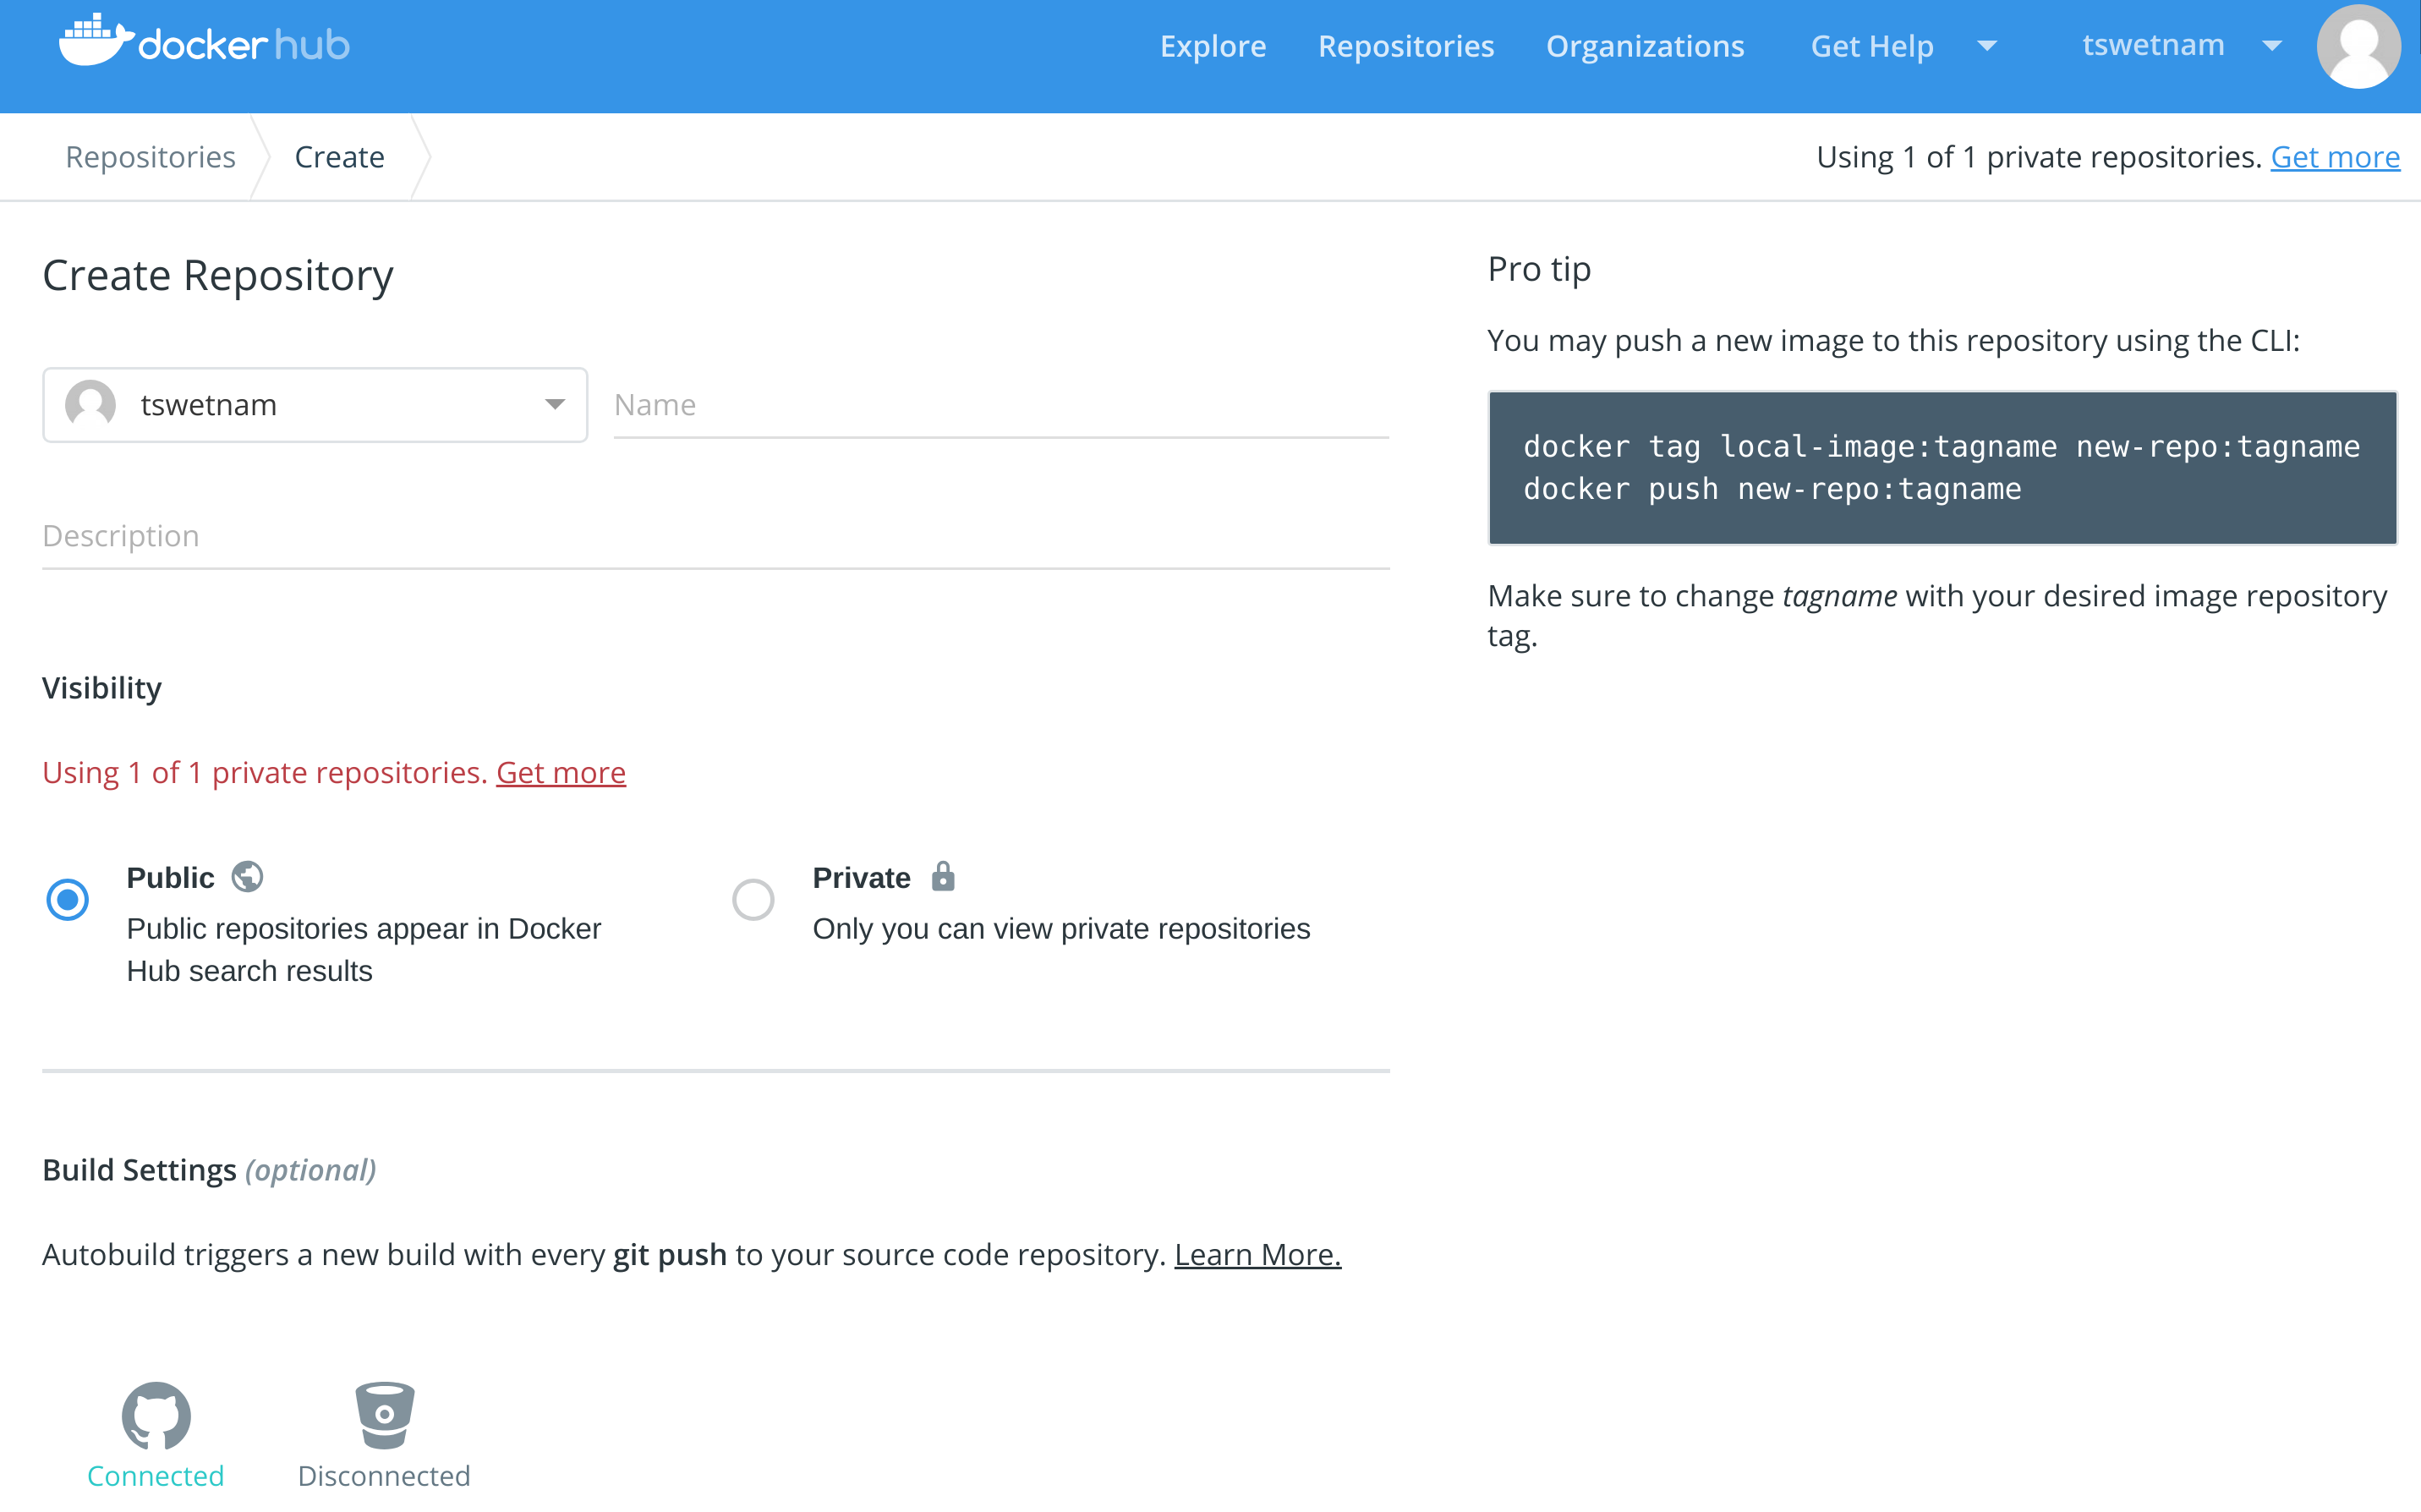
The system prompts you to choose between Public and Private and Limited Access. The Public and Private connection type is required if you want to use the Automated Builds.
- Press
Selectunder Public and Private connection type. If you are not logged into GitHub, the system prompts you to enter GitHub credentials before prompting you to grant access. After you grant access to your code repository, the system returns you to Docker Hub and the link is complete.
After you grant access to your code repository, the system returns you to Docker Hub and the link is complete. For example, github linked hosted repository looks like this:
2.3 Automated Container Builds
Automated build repositories rely on the integration with a version control system (GitHub or Gitlab) where your Dockerfile is kept.
Let’s create an automatic build for our container using the instructions below:
- Initialize git repository for the mynotebook directory you created for your
Dockerfile
$ git init
Initialized empty Git repository in /home/julianp/mynotebook/.git/

$ git status
On branch master

Initial commit

Untracked files:
(use "git add <file>..." to include in what will be committed)

        Dockerfile
        model.py

nothing added to commit but untracked files present (use "git add" to track)

$ git add * && git commit -m "Add files and folders"
[master (root-commit) a4f732a] Add files and folders
 2 files changed, 10 insertions(+)
 create mode 100644 Dockerfile
 create mode 100644 model.py
- Create a new repository on github by navigating to this URL - https://github.com/new
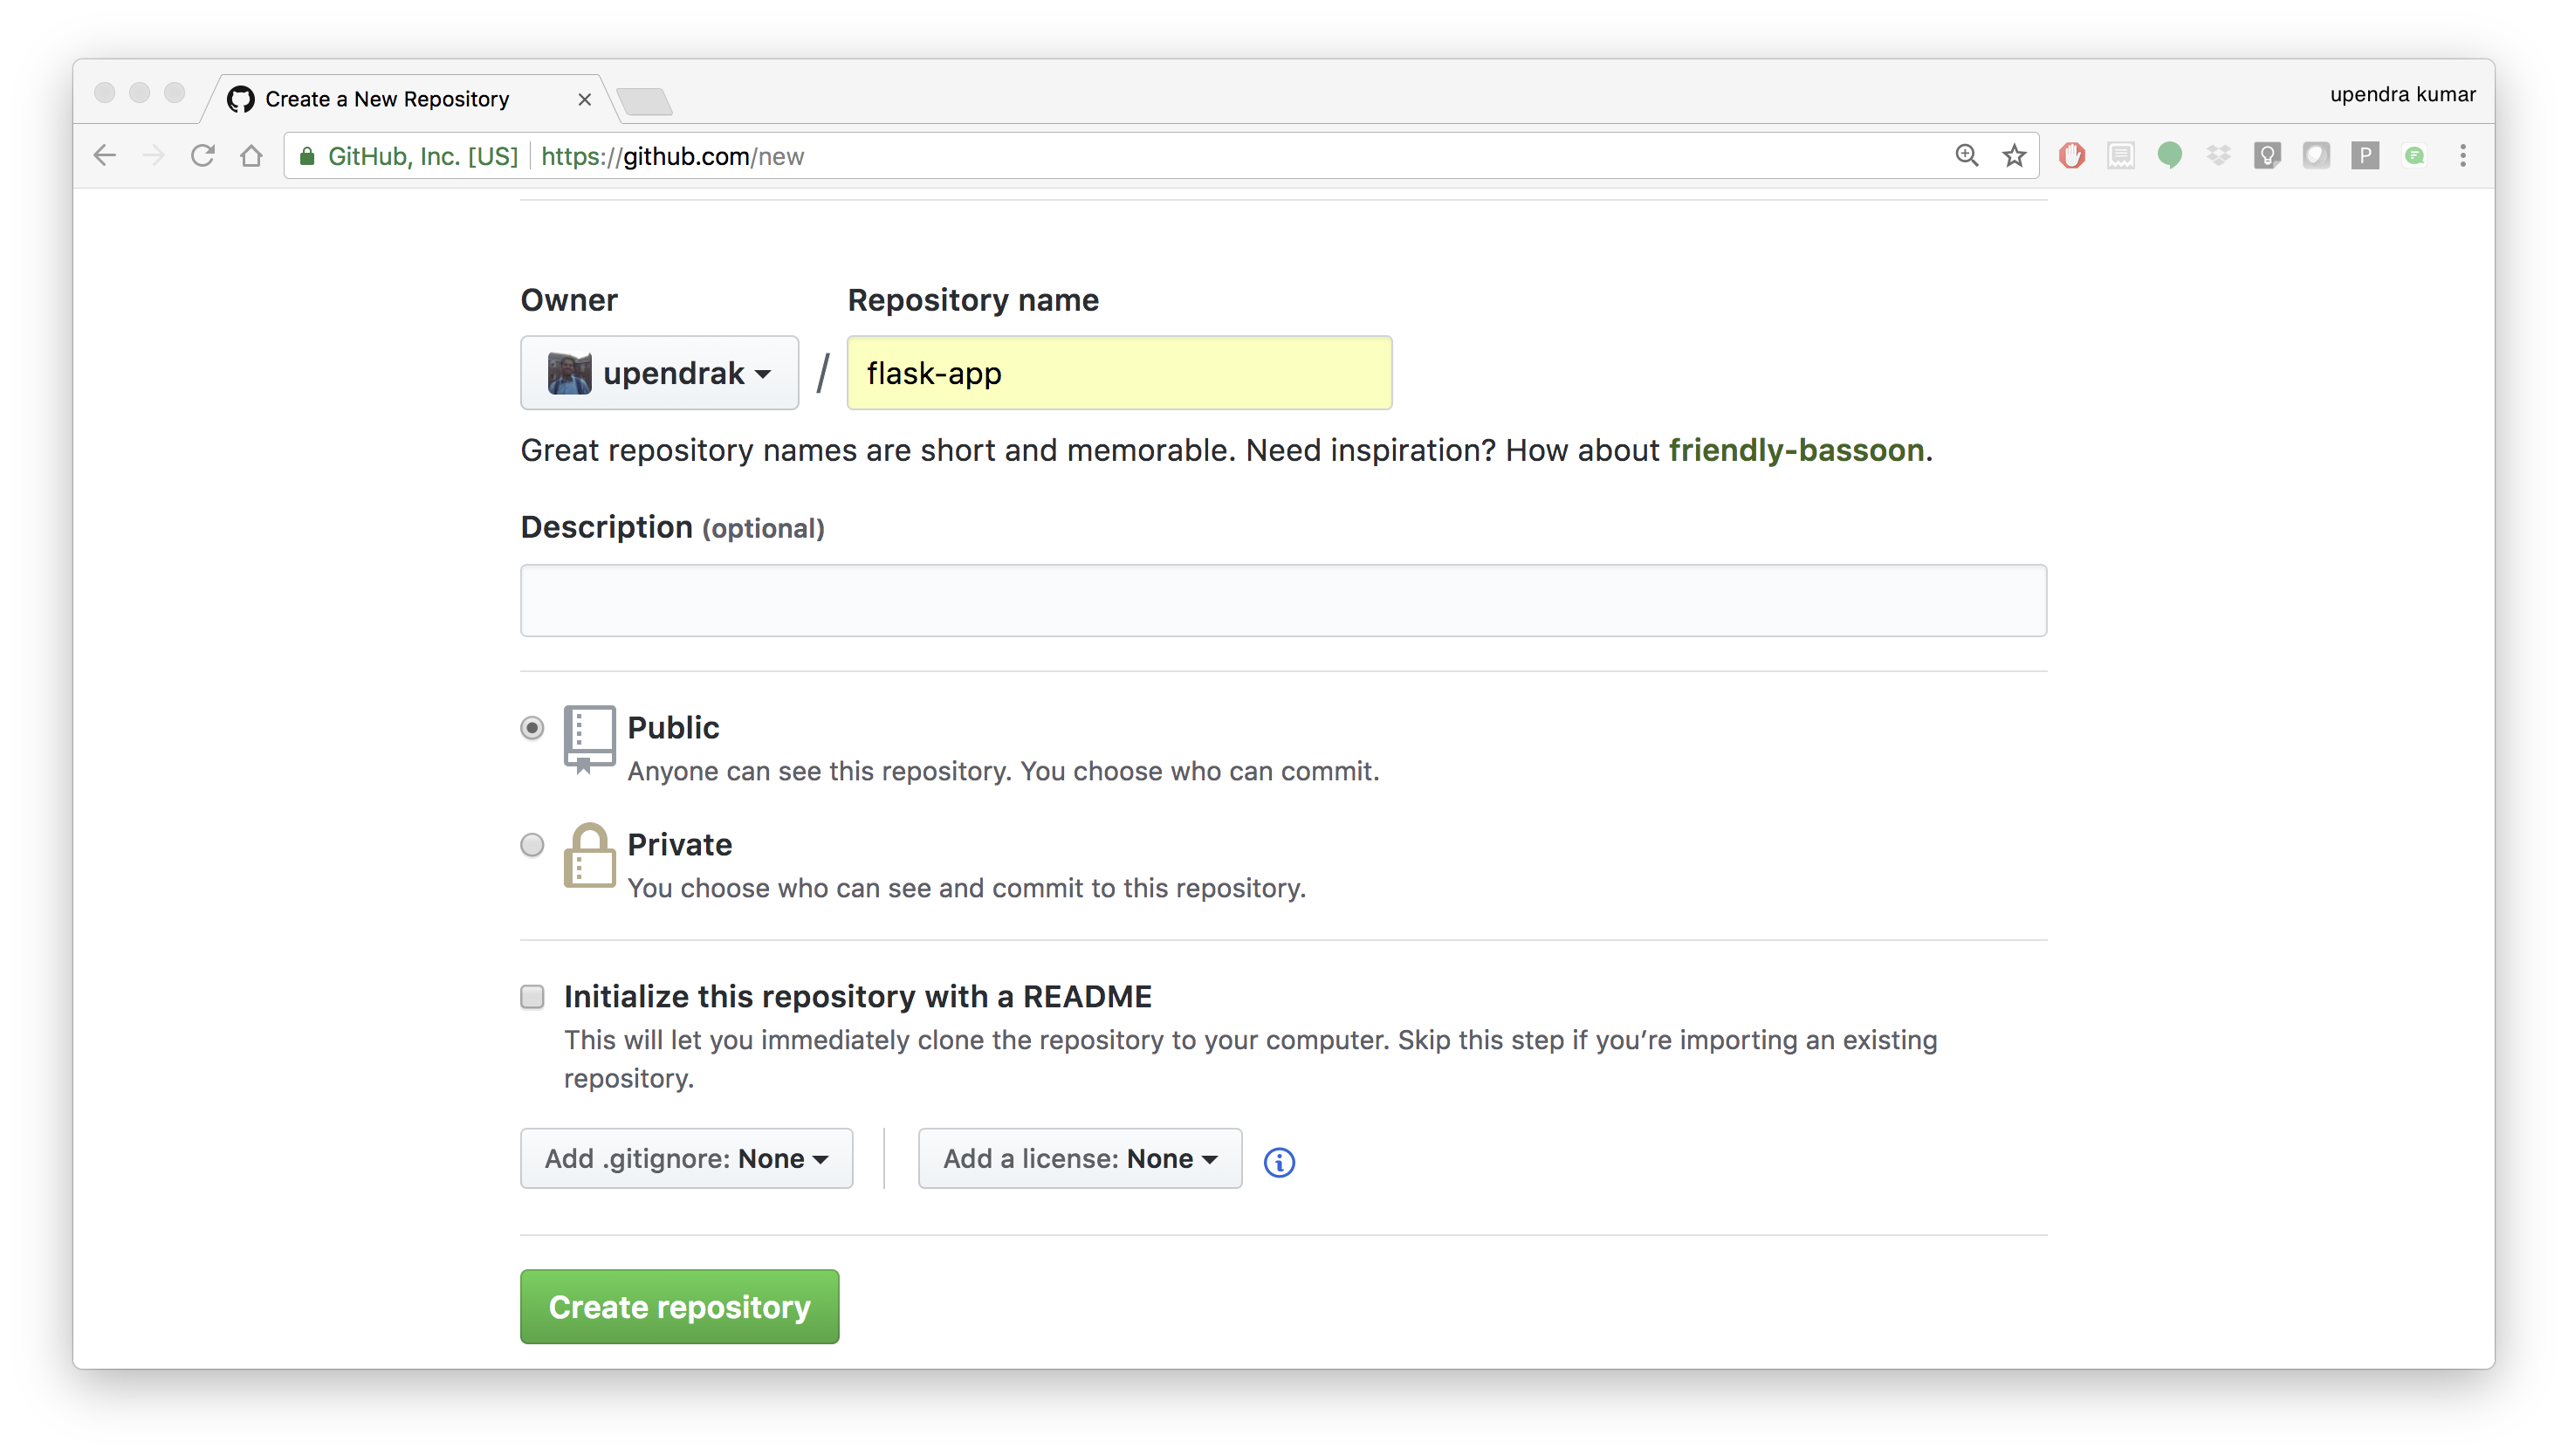
Note
Don’t initialize the repository with a README and don’t add a license.
- Push the repository to github
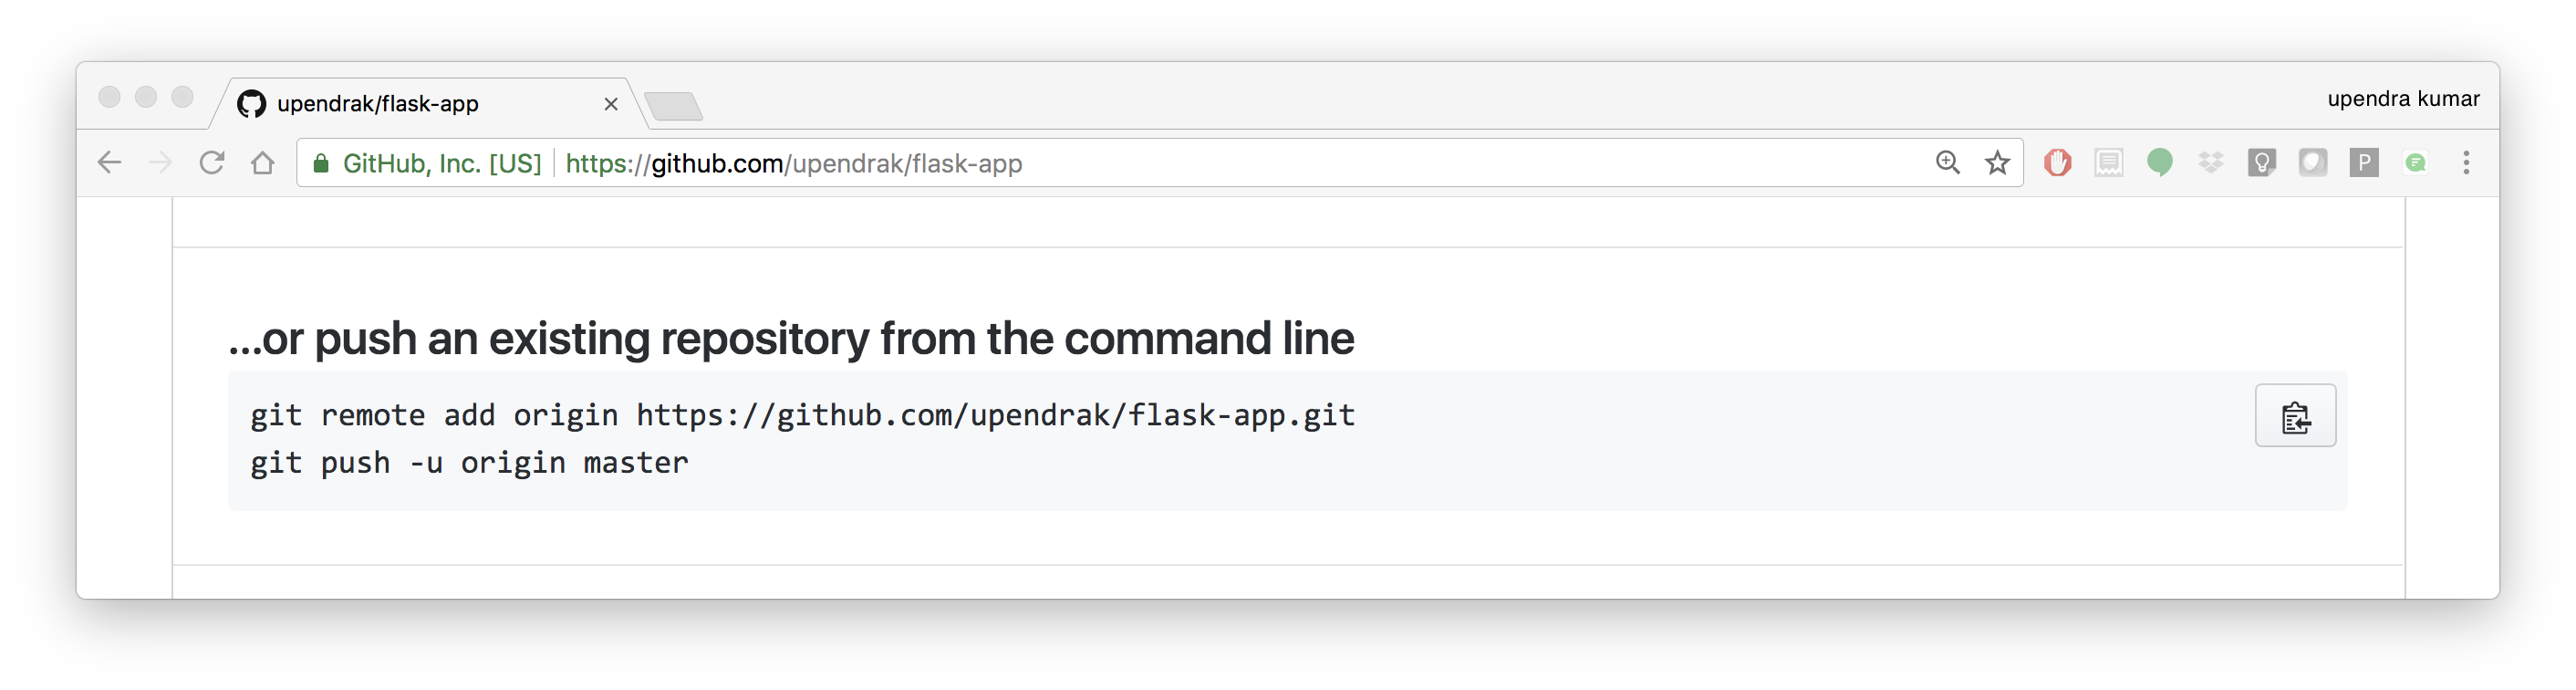
$ git remote add origin https://github.com/<your-github-username>/mynotebook.git

$ git push -u origin master
Counting objects: 7, done.
Delta compression using up to 8 threads.
Compressing objects: 100% (5/5), done.
Writing objects: 100% (7/7), 1.44 KiB | 0 bytes/s, done.
Total 7 (delta 0), reused 0 (delta 0)
To https://github.com/<your-github-username>/mynotebook.git
 * [new branch]      master -> master
Branch master set up to track remote branch master from origin.
- Select
Create>Create Automated Buildfrom Docker Hub.
- The system prompts you with a list of User/Organizations and code repositories.
- For now select your GitHub account from the User/Organizations list on the left. The list of repositories change.
- Pick the project to build. In this case
mynotebook. Type in “Jupyter Test” in the Short Description box. - If you have a long list of repos, use the filter box above the list to restrict the list. After you select the project, the system displays the Create Automated Build dialog.

Note
The dialog assumes some defaults which you can customize. By default, Docker builds images for each branch in your repository. It assumes the Dockerfile lives at the root of your source. When it builds an image, Docker tags it with the branch name.
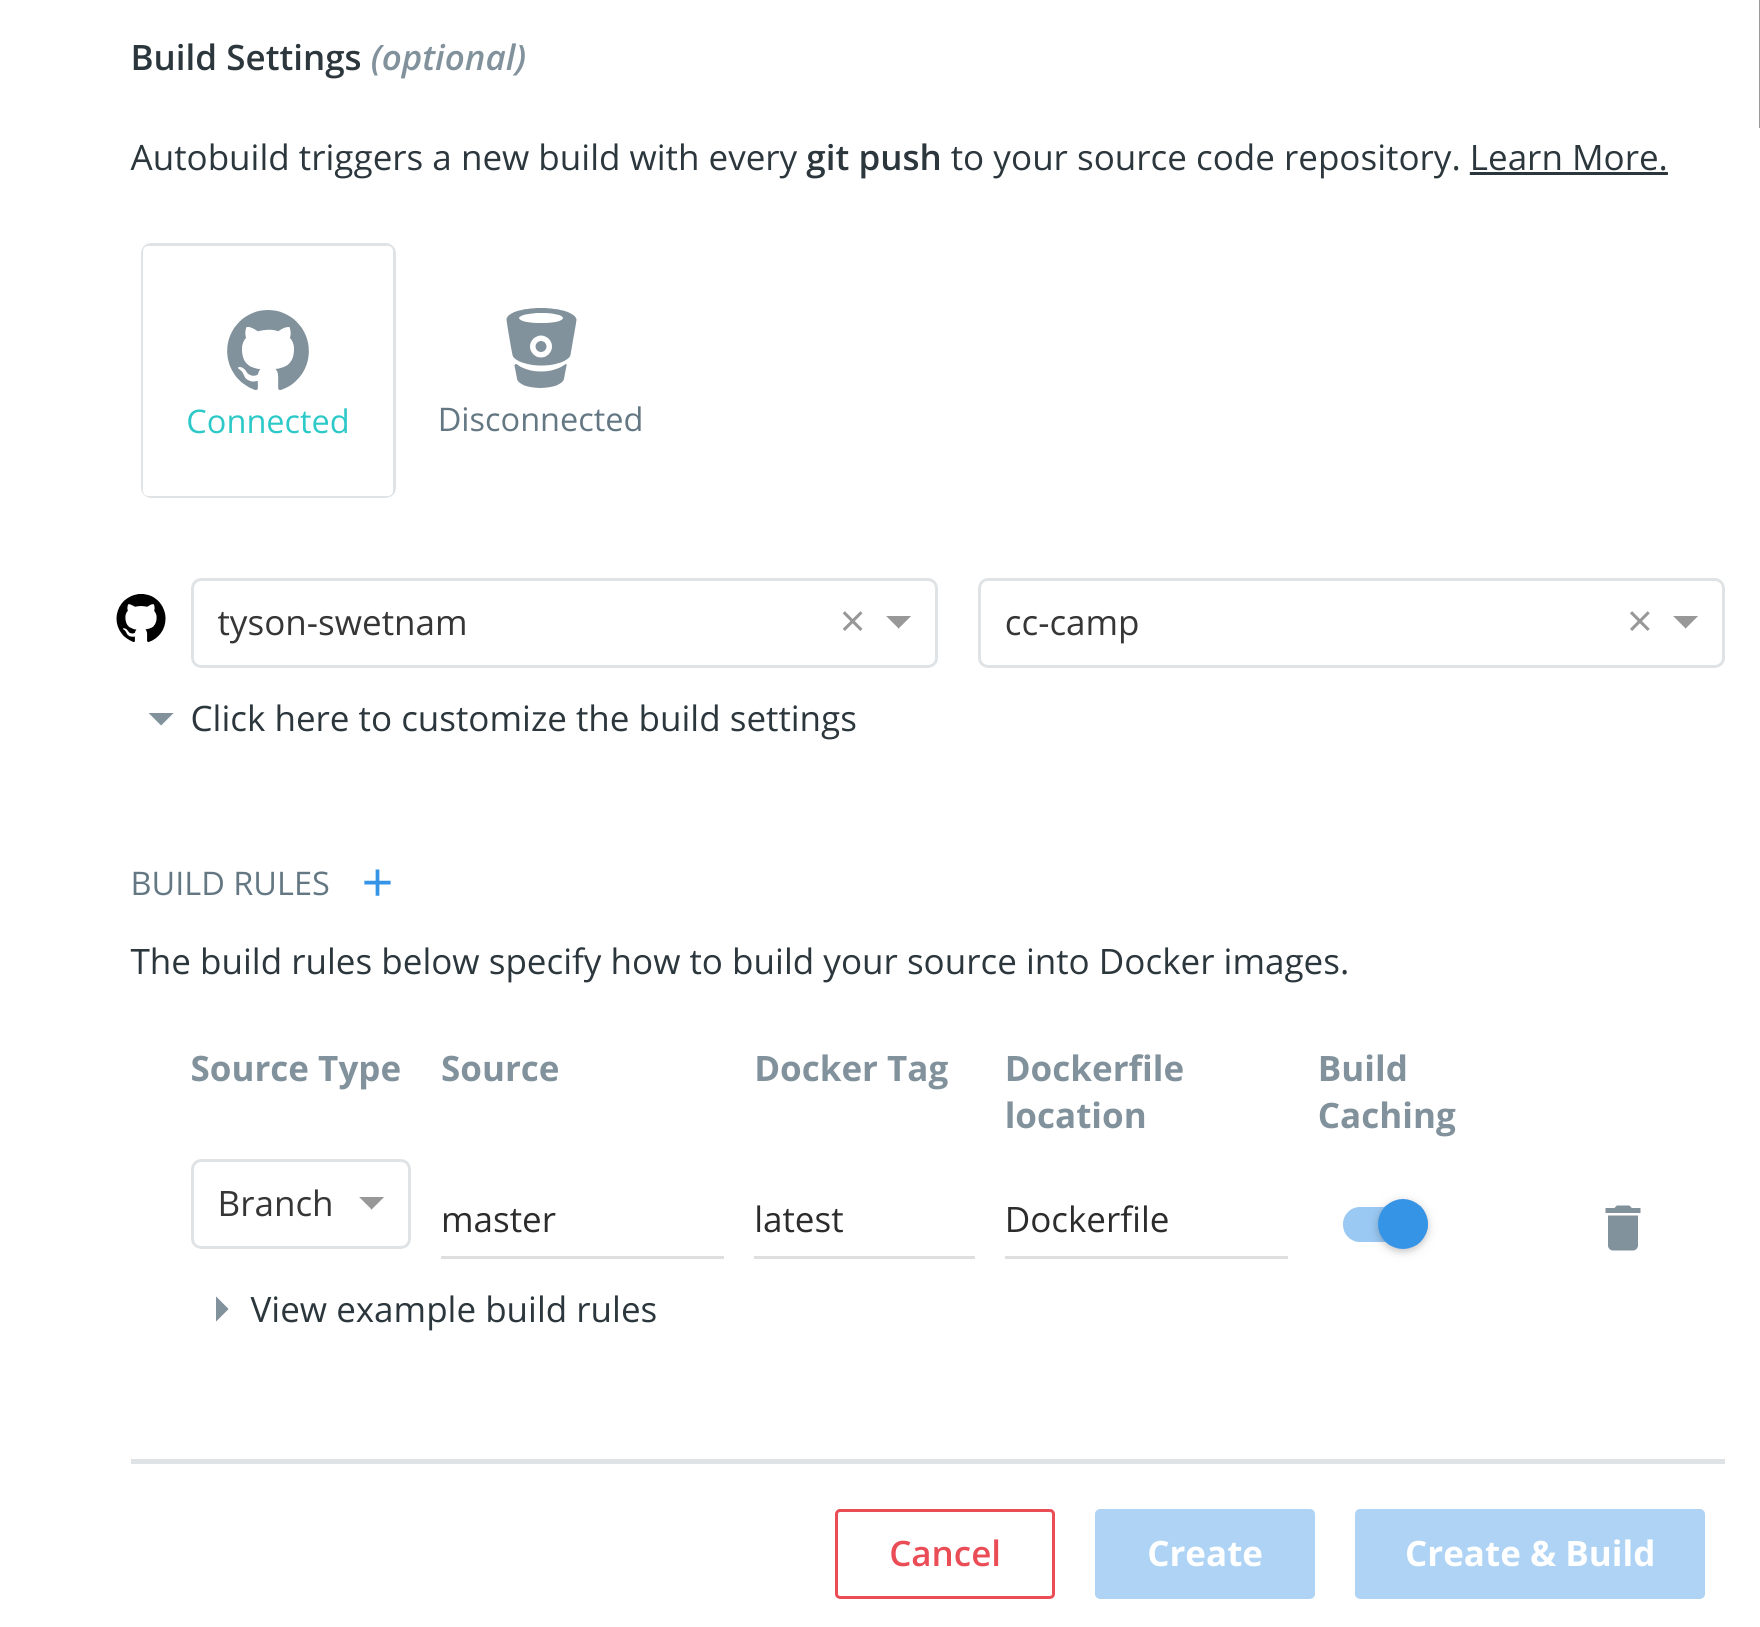
- Customize the automated build by pressing the
Click here to customizebehavior link.
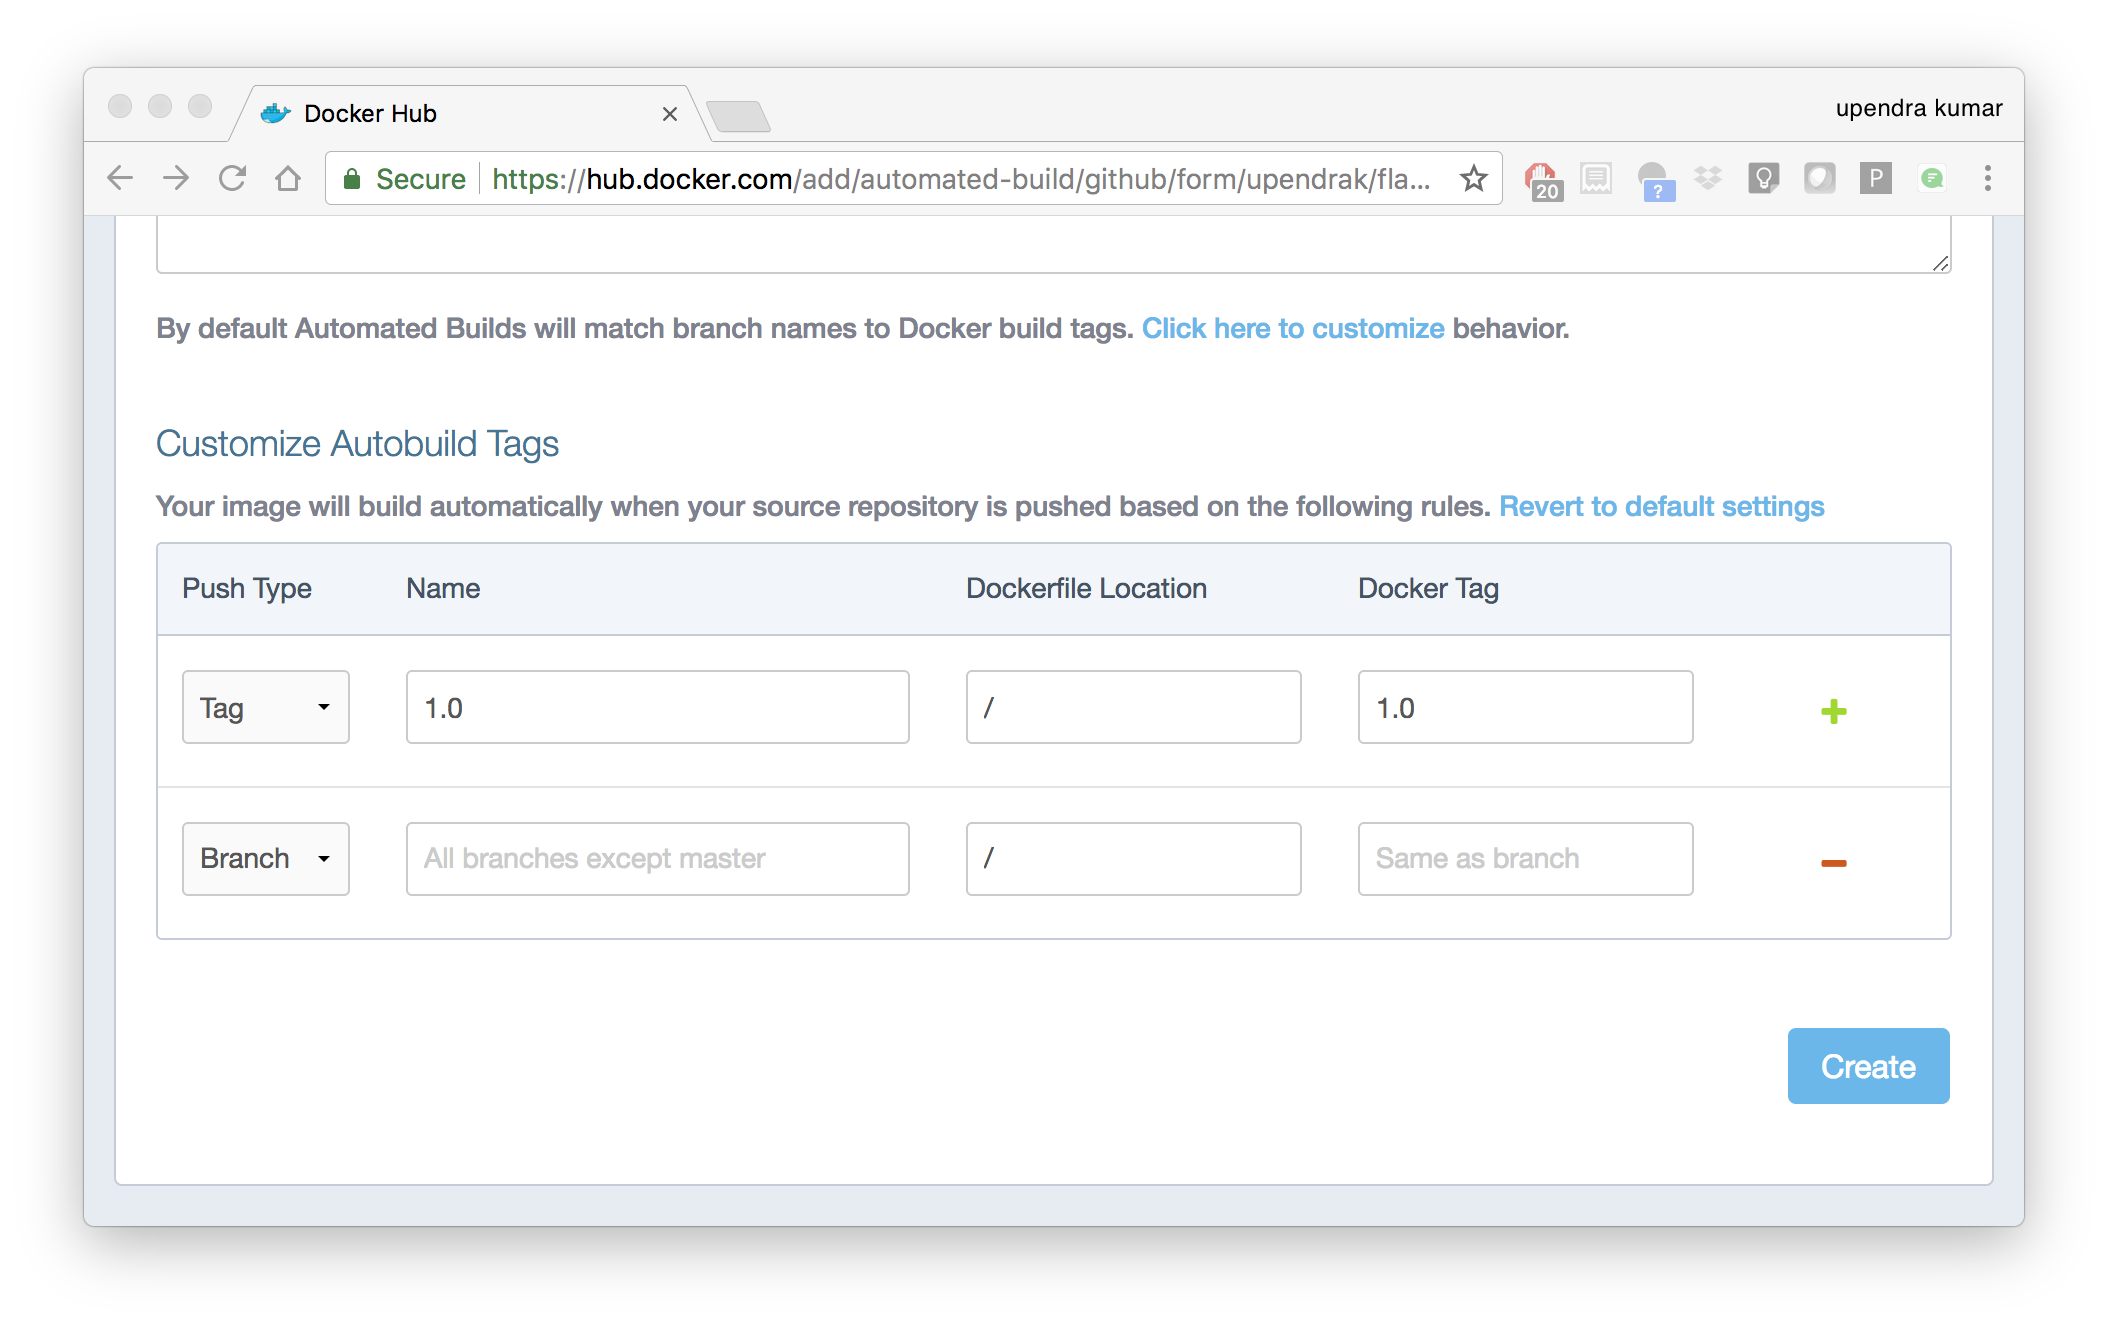
Specify which code branches or tags to build from. You can build by a code branch or by an image tag. You can enter a specific value or use a regex to select multiple values. To see examples of regex, press the Show More link on the right of the page.
- Enter the
master(default) for the name of the branch. - Leave the Dockerfile location as is.
- Recall the file is in the root of your code repository.
- Specify
1.0for the Tag Name.
- Click
Create.
Important
During the build process, Docker copies the contents of your Dockerfile to Docker Hub. The Docker community (for public repositories) or approved team members/orgs (for private repositories) can then view the Dockerfile on your repository page.
The build process looks for a README.md in the same directory as your Dockerfile. If you have a README.md file in your repository, it is used in the repository as the full description. If you change the full description after a build, it’s overwritten the next time the Automated Build runs. To make changes, modify the README.md in your Git repository.
Warning
You can only trigger one build at a time and no more than one every five minutes. If you already have a build pending, or if you recently submitted a build request, Docker ignores new requests.
It can take a few minutes for your automated build job to be created. When the system is finished, it places you in the detail page for your Automated Build repository.
- Manually Trigger a Build
Before you trigger an automated build by pushing to your GitHub mynotebook repo, you’ll trigger a manual build. Triggering a manual build ensures everything is working correctly.
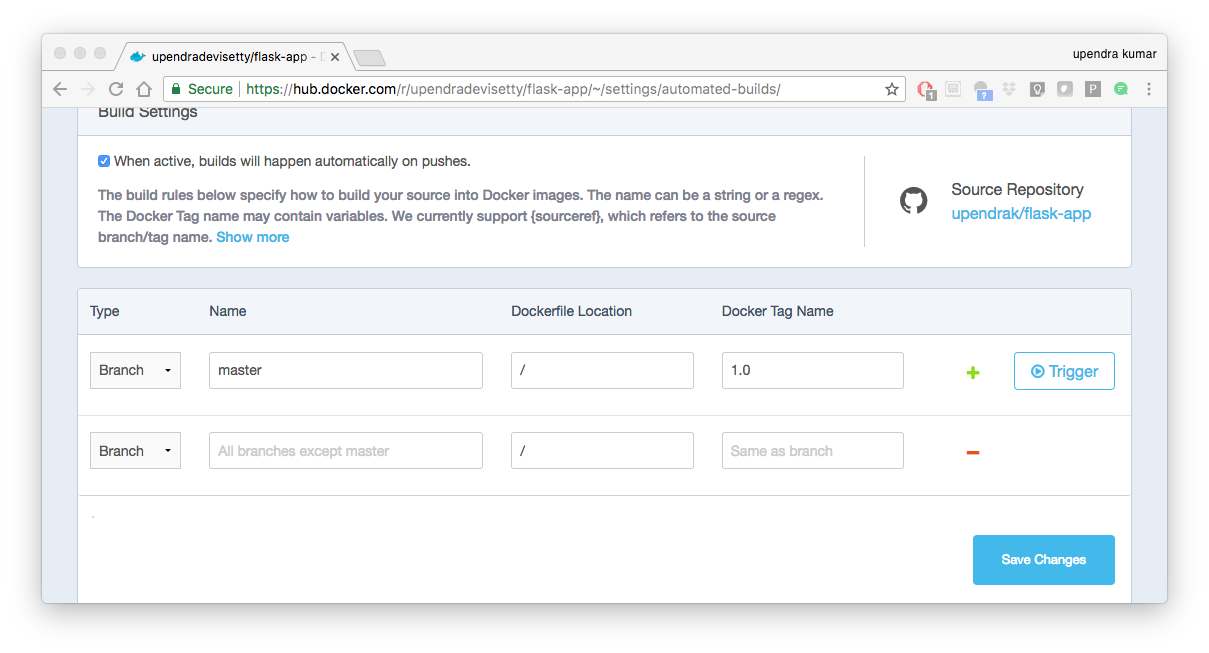
From your automated build page choose Build Settings
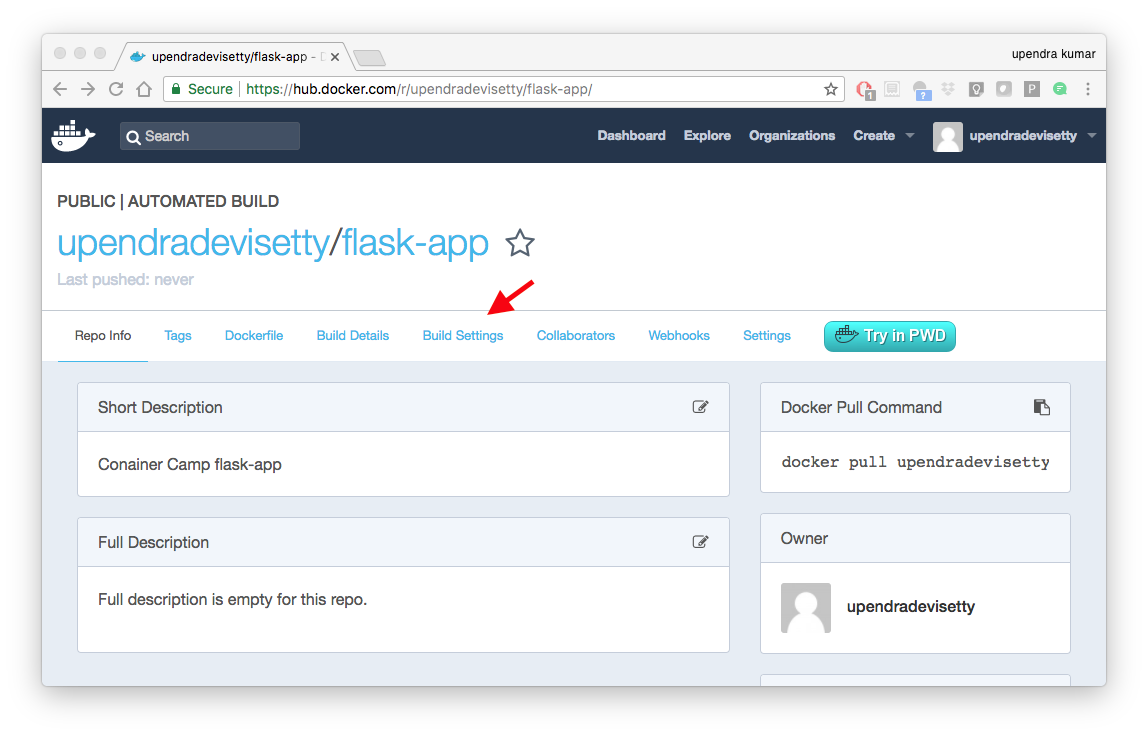
Press Trigger button and finally click Save Changes.
Note
Docker builds everything listed whenever a push is made to the code repository. If you specify a particular branch or tag, you can manually build that image by pressing the Trigger. If you use a regular expression syntax (regex) to define your build branch or tag, Docker does not give you the option to manually build.
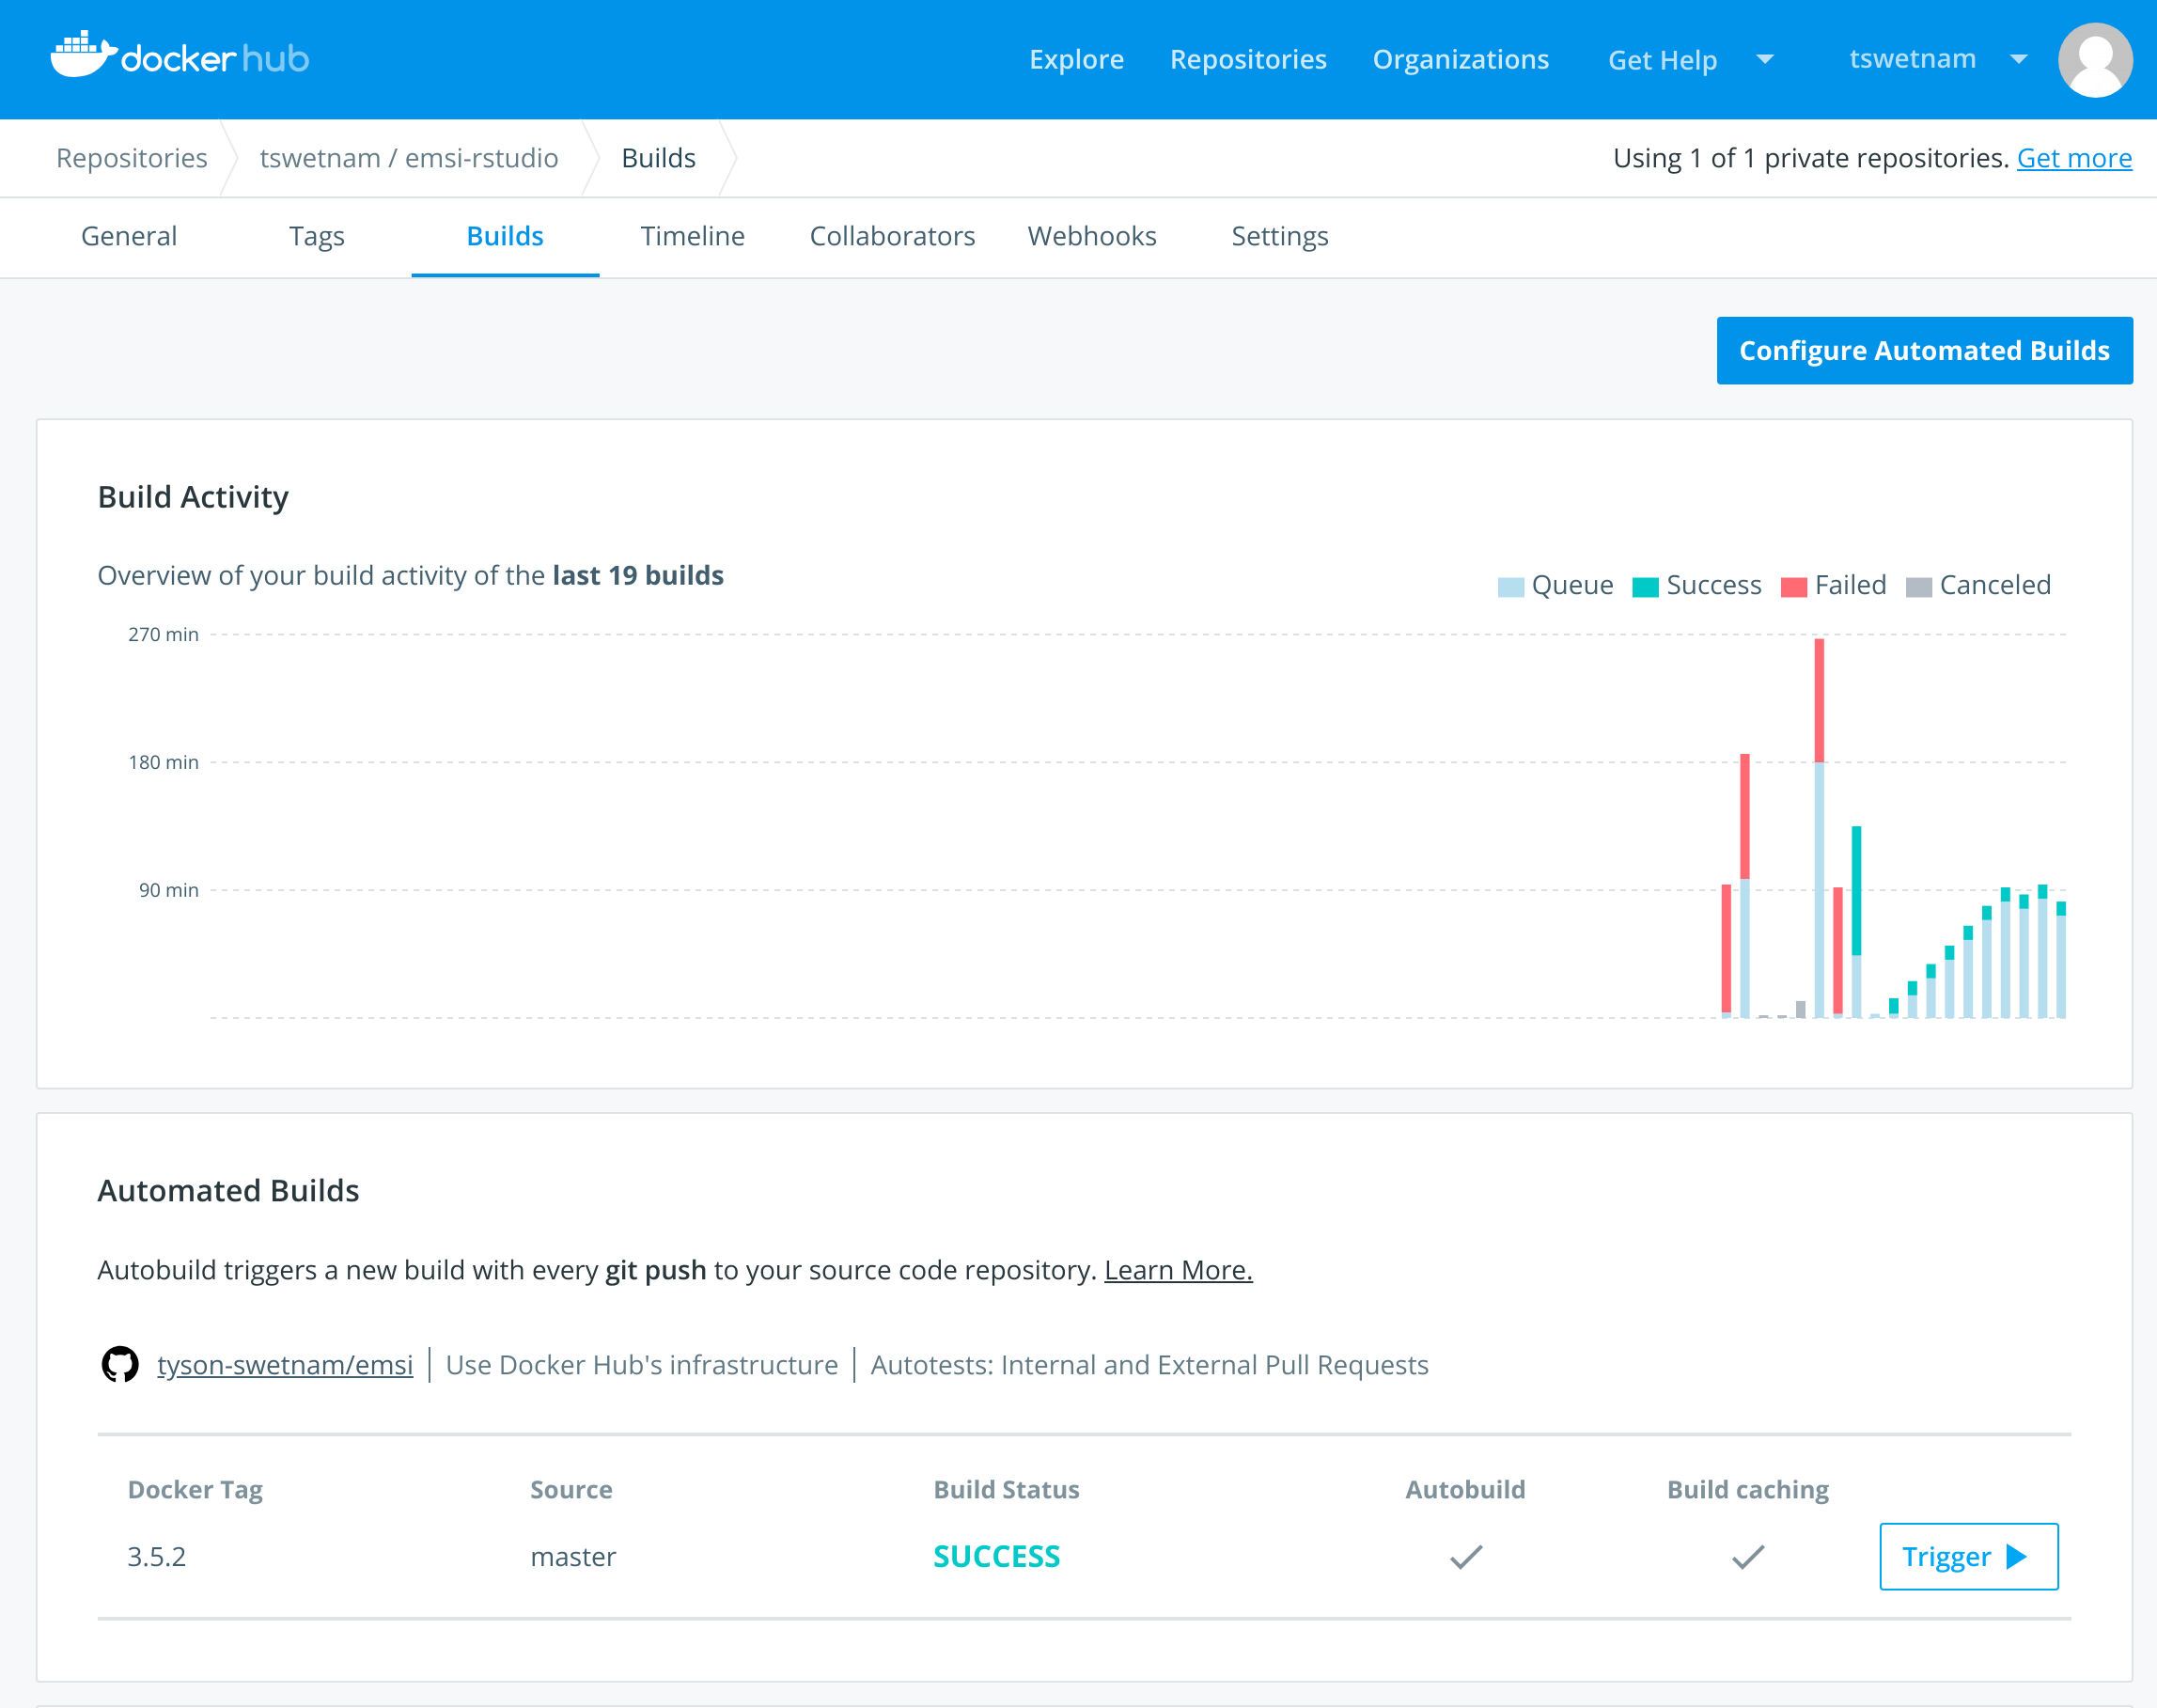
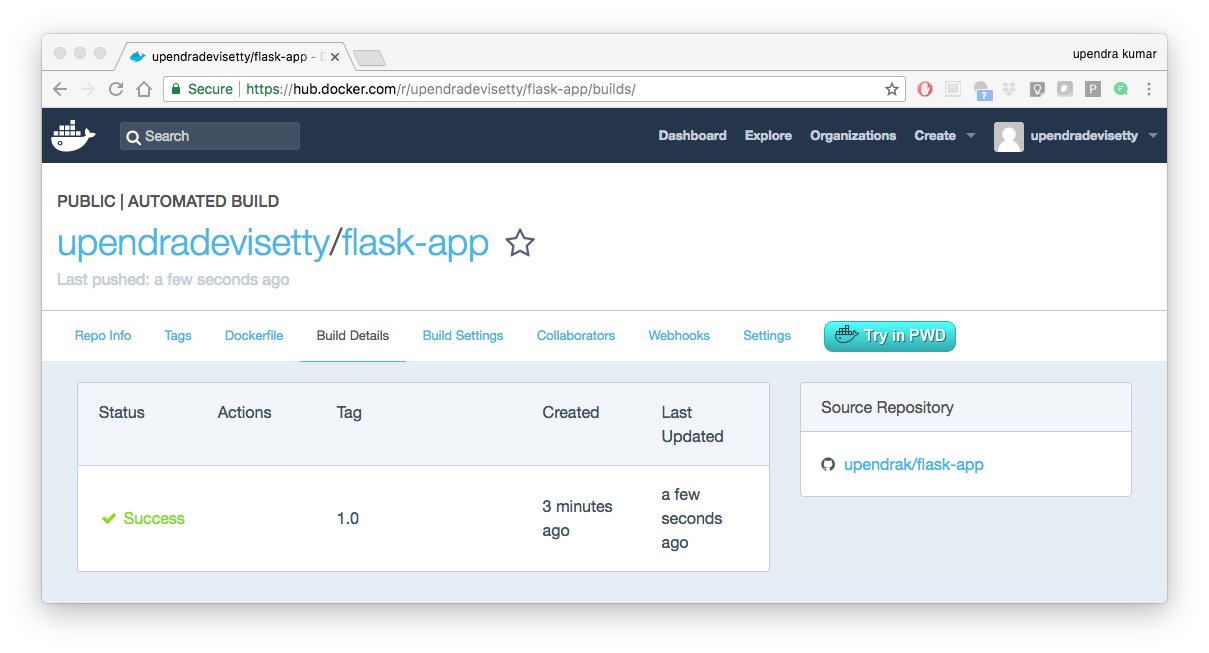
- Review the build results
The Build Details page shows a log of your build systems:
Navigate to the Build Details page.
Wait until your image build is done.
You may have to manually refresh the page and your build may take several minutes to complete.
Exercise 1 (5-10 mins): Updating and automated building
git add,commitandpushto your GitHub or Gitlab repo- Trigger automatic build with a new tag (2.0) on Docker Hub
- Pull your Docker image from Docker Hub to a new location.
- Run the instance to make sure it works
3. Managing Data in Docker
It is possible to store data within the writable layer of a container, but there are some limitations:
- The data doesn’t persist when that container is no longer running, and it can be difficult to get the data out of the container if another process needs it.
- A container’s writable layer is tightly coupled to the host machine where the container is running. You can’t easily move the data somewhere else.
- Its better to put your data into the container AFTER it is build - this keeps the container size smaller and easier to move across networks.
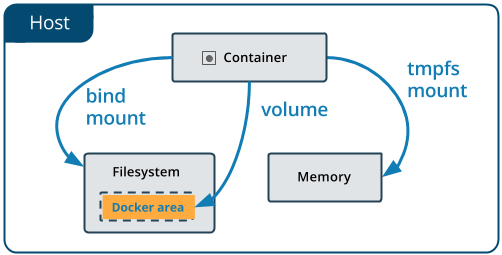
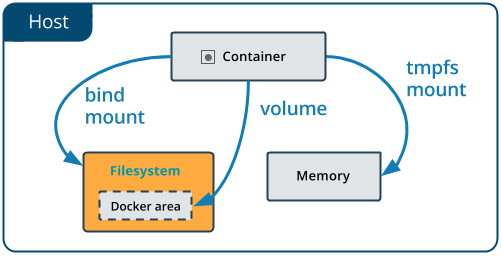
Docker offers three different ways to mount data into a container from the Docker host:
- volumes,
- bind mounts,
- tmpfs volumes.
When in doubt, volumes are almost always the right choice.
3.1 Volumes
Volumes are created and managed by Docker. You can create a new volume explicitly using the docker volume create command, or Docker can create a volume in the container when the container is built.
Volumes are often a better choice than persisting data in a container’s writable layer, because using a volume does not increase the size of containers using it, and the volume’s contents exist outside the lifecycle of a given container. While bind mounts (which we will see later) are dependent on the directory structure of the host machine, volumes are completely managed by Docker. Volumes have several advantages over bind mounts:
- Volumes are easier to back up or migrate than bind mounts.
- You can manage volumes using Docker CLI commands or the Docker API.
- Volumes work on both Linux and Windows containers.
- Volumes can be more safely shared among multiple containers.
- A new volume’s contents can be pre-populated by a container.
Note
If your container generates non-persistent state data, consider using a tmpfs mount to avoid storing the data anywhere permanently, and to increase the container’s performance by avoiding writing into the container’s writable layer.
3.1.1 Choose the -v or –mount flag for mounting volumes
Originally, the -v or --volume flag was used for standalone containers and the --mount flag was used for swarm services. However, starting with Docker 17.06, you can also use --mount with standalone containers. In general, --mount is more explicit and verbose. The biggest difference is that the -v syntax combines all the options together in one field, while the --mount syntax separates them. Here is a comparison of the syntax for each flag.
Tip
New users should use the --mount syntax. Experienced users may be more familiar with the -v or --volume syntax, but are encouraged to use --mount, because research has shown it to be easier to use.
-v or --volume: Consists of three fields, separated by colon characters (:). The fields must be in the correct order, and the meaning of each field is not immediately obvious.
- In the case of named volumes, the first field is the name of the volume, and is unique on a given host machine.
- The second field is the path where the file or directory are mounted in the container.
- The third field is optional, and is a comma-separated list of options, such as
ro.
3.2 Bind mounts
When you run a container, you can bring a directory from the host system into the container, and give it a new name and location using the -v or --volume flag.
$ mkdir -p ~/local-data-folder
$ echo "some data" >> ~/local-data-folder/data.txt
$ docker run -v ${HOME}/local-data-folder:/data $YOUR_DOCKERHUB_USERNAME/mynotebook:latest cat /data/data.txt
In the example above, you can mount a folder from your localhost, in your home user directory into the container as a new directory named /data.
3.3 Create and manage volumes
Unlike a bind mount, you can create and manage volumes outside the scope of any container.
A given volume can be mounted into multiple containers simultaneously. When no running container is using a volume, the volume is still available to Docker and is not removed automatically. You can remove unused volumes using docker volume prune command.
When you create a Docker volume, it is stored within a directory on the Docker Linux host (/var/lib/docker/
Note
File location on Mac OS X is a bit different: https://timonweb.com/posts/getting-path-and-accessing-persistent-volumes-in-docker-for-mac/
Let’s create a volume
$ docker volume create my-vol
List volumes:
$ docker volume ls

local               my-vol
Inspect a volume by looking at the Mount section in the docker volume inspect
$ docker volume inspect my-vol
[
    {
        "Driver": "local",
        "Labels": {},
        "Mountpoint": "/var/lib/docker/volumes/my-vol/_data",
        "Name": "my-vol",
        "Options": {},
        "Scope": "local"
    }
]
Remove a volume
$ docker volume rm my-vol
$ docker volume ls
3.3.1 Populate a volume using a container
This example starts an alpine container and populates the new volume output-vol with the some output created by the container.
docker volume create output-vol
docker run --name=data-app --mount source=output-vol,target=/data alpine sh -c 'env >> /data/container-env.txt'
Use docker inspect output-vol to see where the volume data lives on your host, and then use cat to confirm that it contains the output created by the container.
docker volume inspect output-vol
sudo cat /var/lib/docker/volumes/output-vol/_data/container-env.txt
You should see something like:
After running either of these examples, run the following commands to clean up the container and volume.
docker rm data-app
docker volume rm output-vol
3.4 Bind mounts
Bind mounts: When you use a bind mount, a file or directory on the host machine is mounted into a container.
Tip
If you are developing new Docker applications, consider using named volumes instead. You can’t use Docker CLI commands to directly manage bind mounts.
Warning
One side effect of using bind mounts, for better or for worse, is that you can change the host filesystem via processes running in a container, including creating, modifying, or deleting important system files or directories. This is a powerful ability which can have security implications, including impacting non-Docker processes on the host system.
If you use --mount to bind-mount a file or directory that does not yet exist on the Docker host, Docker does not automatically create it for you, but generates an error.
3.2.1 Start a container with a bind mount
Create a bind-data directory in your home directory.
cd ~
mkdir -p ~/bind-data
Run a container, mounting this directory inside the container, and the container should create some data in there.
docker run --mount type=bind,source="$(pwd)"/bind-data,target=/data alpine sh -c 'env >> /data/container-env.txt'
Check that the output looks right.
cat ~/bind-data/container-env.txt
3.4.1 Use a read-only bind mount
For some development applications, the container needs to write into the bind mount, so changes are propagated back to the Docker host. At other times, the container only needs read access.
This example modifies the one above but mounts the directory as a read-only bind mount, by adding ro to the (empty by default) list of options, after the mount point within the container. Where multiple options are present, separate them by commas.
docker run --mount type=bind,source="$(pwd)"/bind-data,target=/data,readonly alpine sh -c 'ls -al /data/ && env >> /data/container-env.txt'
You should see an error message about not being able to write to a read-only file system.
sh: can't create /data/container-env.txt: Read-only file system
4. Docker Compose for multi-container apps
Docker Compose is a tool for defining and running your multi-container Docker applications.
Main advantages of Docker compose include:
- Your applications can be defined in a YAML file where all the options that you used in
docker runare now defined (Reproducibility). - It allows you to manage your application as a single entity rather than dealing with individual containers (Simplicity).
Let’s now create a simple web app with Docker Compose using Flask (which you already seen before) and Redis. We will end up with a Flask container and a Redis container all on one host.
Note
The code for the above compose example is available here
- You’ll need a directory for your project on your host machine:
$ mkdir compose_flask && cd compose_flask
- Add the following to requirements.txt inside compose_flask directory:
flask
redis
- Copy and paste the following code into a new file called app.py inside compose_flask directory:
from flask import Flask
from redis import Redis
app = Flask(__name__)
redis = Redis(host='redis', port=6379)
@app.route('/')
def hello():
redis.incr('hits')
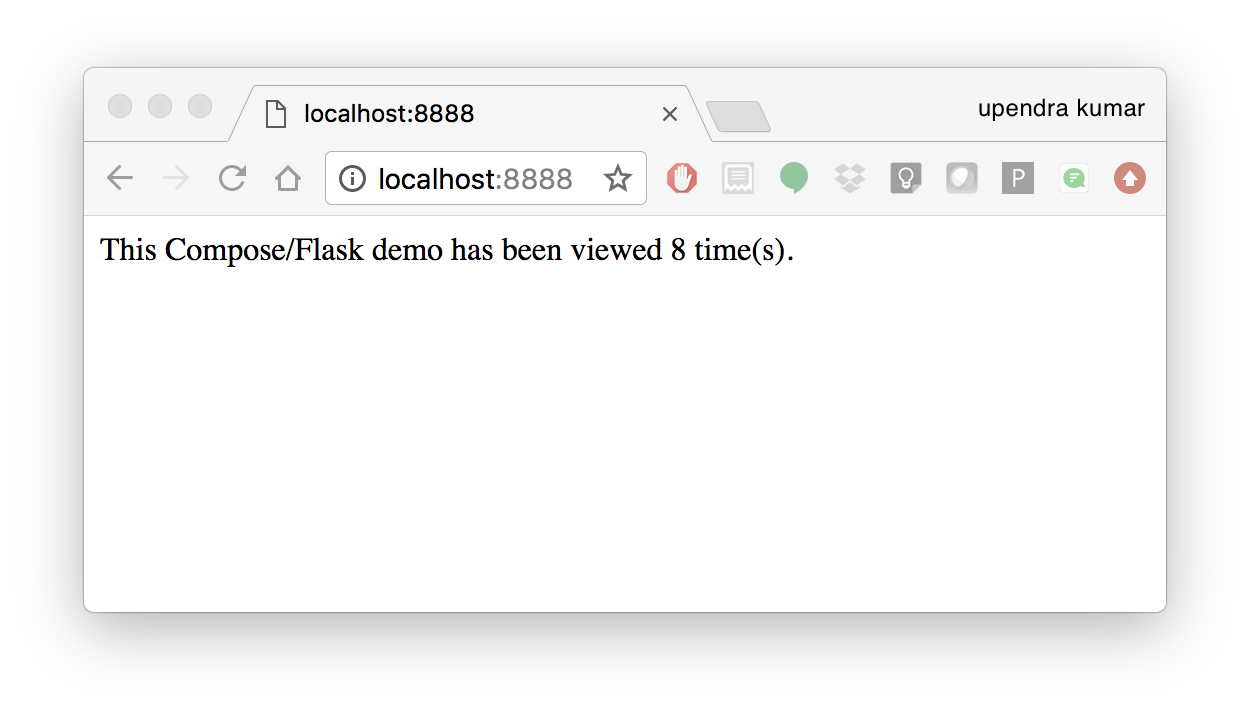
return 'This Compose/Flask demo has been viewed %s time(s).' % redis.get('hits')
if __name__ == "__main__":
app.run(host="0.0.0.0", debug=True)
- Create a Dockerfile with the following code inside
compose_flaskdirectory:
FROM python:2.7
ADD . /code
WORKDIR /code
RUN pip install -r requirements.txt
CMD python app.py
- Add the following code to a new file,
docker-compose.yml, in your project directory:
version: '2'
services:
    web:
        restart: always
        build: .
        ports:
            - "8888:5000"
        volumes:
            - .:/code
        depends_on:
            - redis
    redis:
        restart: always
        image: redis
A brief explanation of docker-compose.yml is as below:
restart: alwaysmeans that it will restart whenever it fails.- We define two services, web and redis.
- The web service builds from the Dockerfile in the current directory.
- Forwards the container’s exposed port (5000) to port 8888 on the host.
- Mounts the project directory on the host to /code inside the container (allowing you to modify the code without having to rebuild the image).
depends_onlinks the web service to the Redis service.- The redis service uses the latest Redis image from Docker Hub.
Note
Docker for Mac and Docker Toolbox already include Compose along with other Docker apps, so Mac users do not need to install Compose separately. Docker for Windows and Docker Toolbox already include Compose along with other Docker apps, so most Windows users do not need to install Compose separately.
For Linux users
sudo curl -L https://github.com/docker/compose/releases/download/1.19.0/docker-compose-`uname -s`-`uname -m` -o /usr/local/bin/docker-compose

sudo chmod +x /usr/local/bin/docker-compose
- Build and Run with
docker-compose up -dcommand
$ docker-compose up -d

Building web
Step 1/5 : FROM python:2.7
2.7: Pulling from library/python
f49cf87b52c1: Already exists
7b491c575b06: Already exists
b313b08bab3b: Already exists
51d6678c3f0e: Already exists
09f35bd58db2: Already exists
f7e0c30e74c6: Pull complete
c308c099d654: Pull complete
339478b61728: Pull complete
Digest: sha256:8cb593cb9cd1834429f0b4953a25617a8457e2c79b3e111c0f70bffd21acc467
Status: Downloaded newer image for python:2.7
 ---> 9e92c8430ba0
Step 2/5 : ADD . /code
 ---> 746bcecfc3c9
Step 3/5 : WORKDIR /code
 ---> c4cf3d6cb147
Removing intermediate container 84d850371a36
Step 4/5 : RUN pip install -r requirements.txt
 ---> Running in d74c2e1cfbf7
Collecting flask (from -r requirements.txt (line 1))
  Downloading Flask-0.12.2-py2.py3-none-any.whl (83kB)
Collecting redis (from -r requirements.txt (line 2))
  Downloading redis-2.10.6-py2.py3-none-any.whl (64kB)
Collecting itsdangerous>=0.21 (from flask->-r requirements.txt (line 1))
  Downloading itsdangerous-0.24.tar.gz (46kB)
Collecting Jinja2>=2.4 (from flask->-r requirements.txt (line 1))
  Downloading Jinja2-2.10-py2.py3-none-any.whl (126kB)
Collecting Werkzeug>=0.7 (from flask->-r requirements.txt (line 1))
  Downloading Werkzeug-0.14.1-py2.py3-none-any.whl (322kB)
Collecting click>=2.0 (from flask->-r requirements.txt (line 1))
  Downloading click-6.7-py2.py3-none-any.whl (71kB)
Collecting MarkupSafe>=0.23 (from Jinja2>=2.4->flask->-r requirements.txt (line 1))
  Downloading MarkupSafe-1.0.tar.gz
Building wheels for collected packages: itsdangerous, MarkupSafe
  Running setup.py bdist_wheel for itsdangerous: started
  Running setup.py bdist_wheel for itsdangerous: finished with status 'done'
  Stored in directory: /root/.cache/pip/wheels/fc/a8/66/24d655233c757e178d45dea2de22a04c6d92766abfb741129a
  Running setup.py bdist_wheel for MarkupSafe: started
  Running setup.py bdist_wheel for MarkupSafe: finished with status 'done'
  Stored in directory: /root/.cache/pip/wheels/88/a7/30/e39a54a87bcbe25308fa3ca64e8ddc75d9b3e5afa21ee32d57
Successfully built itsdangerous MarkupSafe
Installing collected packages: itsdangerous, MarkupSafe, Jinja2, Werkzeug, click, flask, redis
Successfully installed Jinja2-2.10 MarkupSafe-1.0 Werkzeug-0.14.1 click-6.7 flask-0.12.2 itsdangerous-0.24 redis-2.10.6
 ---> 5cc574ff32ed
Removing intermediate container d74c2e1cfbf7
Step 5/5 : CMD python app.py
 ---> Running in 3ddb7040e8be
 ---> e911b8e8979f
Removing intermediate container 3ddb7040e8be
Successfully built e911b8e8979f
Successfully tagged composeflask_web:latest
And that’s it! You should be able to see the Flask application running on http://localhost:8888 or <ipaddress>:8888
$ cat output.txt
Prediction of DecisionTreeClassifier:['apple' 'orange' 'apple']